Friday, January 28, 2011

What do you do with your envelopes? Part Two.


This was just a whim and a distraction, an enjoyable one. I have made a book with old envelopes before, where it is I do not know; perhaps I gave it away, who knows?

 The trigger for this little book came from the work of an Australian book artist Adele Outteridge. There is a good video of her talking about her books made of recycled materials on You Tube.

 I made the covers from an old For Sale board and that idea came from the tutor on my medieval book binding course.

 Ever since then I have been looking out for old boards, imagine my frenzied excitement when I saw one at the recycling centre near our local library.  It was a pity that it was attached to a large post with huge rivets. Would that stop me, no way. I went into the library and asked to borrow scissors, and then set about detaching all of the board that I could manage. They probably thought I was crazy and perhaps they were right! The first job was to get out the baby wipes and give the board a good clean.

Today I went to see the exhibition of Alice Kettle's work in the local museum.It is certainly the most impressive show of her work which I have seen. I particularlylike the way she is now combining textiles with ceramics, and painting. The colourswere very strong, particularly with the winter sunshine streaming through the front windows.

Do something interesting with your envelopes and I will link to your work here.
Lin Artiblobs, see her work here.

Monday, January 24, 2011

Mosaic Monday


Mosaic Monday
Originally uploaded by Feltbug
Feltbug kindly included my work.Take a look at Flickr to follow links to interesting work chosen by her.

Monday, January 17, 2011

'Persian Palaces' 3


These are some images of the free machining I have done on the Persian Palaces hanging. It is not really quilted but backed with a piece of brushed calico, which is almost like a thin blanket.


I also used my free sample of Dylon in ‘Goldfish Orange’ to dye a piece of cotton poplin for part of the binding. It was so easy, but the colours are more limited than using Procion MX. I love the burst of colour on my wall.

I have a new sewing table bought with Christmas money. Don’t you think it is smart? With the castors taken off it almost aligns perfectly with the computer table I have used as a sewing table for years. I was given sewing table envy by seeing the one Melanie Testa uses; I had no idea I needed or wanted one before seeing hers.


Then I found my blog hero for January  Leah Day. She has wonderful videos of free machine quilting on her blog,from which I sort of got the patterns I have used. Even if you never want to do this, they are so relaxing to watch.

She became a hero when I watched her video in which she advises cutting off part of her darning foot to make seeing what one is sewing easier. It made me laugh and admire her nerve too. The sewing table is advertised on her blog, and I just had to get one after viewing the demonstration numerous times. It really does help to have a nice flat surface.

To Christine who lurks, I appreciate your comment, please keep coming back. I’m so pleased to have any lurkers, it’s the people who download numerous images without a thank you that I feel the urge to get at occasionally.

Tuesday, January 04, 2011

Tutorial

I am taking part in the 2011 Setchbook Challenge;see the badge in the side bar.
Each month there will be a new challenge set by a different artist. Images are
uploaded to Flickr. For January the theme is 'Highly Prized'.
I have been asked for a tutorial on one of the images I added, so here it is.
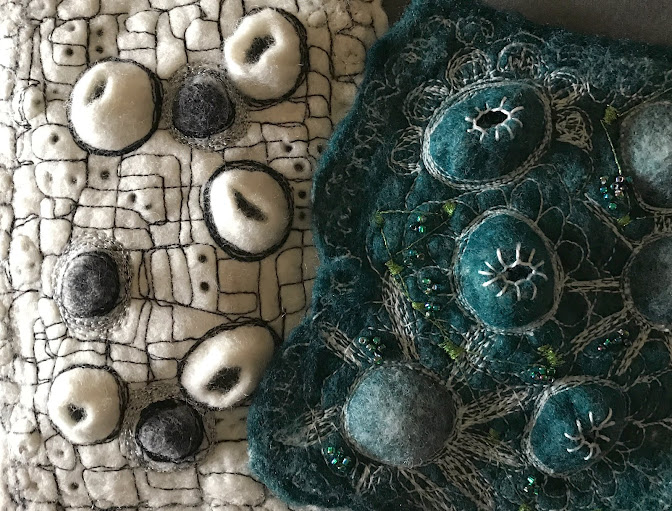
Bleach discharge as a sketch technique.


Colour you sketchbook page using ink. I applied mine with a piece of sponge.

I used a blue/black drawing ink, but try what you have.


Decide on your subject matter and make a quick sketch.


I cut sponge shapes using the sketch as a rough guide. I have used compressed sponge, which looks like sheets of thin cardboard but when soaked in water expands and has an interesting texture. You can, of course, cut up any cheap sponge.


Next pour out a small amount of bleach. You may like to wear gloves for this part.

Dab the sponge into the bleach and make marks on the coloured page.

As you watch the bleached surface will change colour, in my case from green to white.

Apply the bleach gently. Try not to dribble the bleach and beware of getting it on your clothes, as it will quickly discolour whatever it touches.

Additional marks may be made using a cotton bud.


The next step is get out your pens and work into the sketch outlined with bleach. Try out various pens and see if you can get some interesting results. My white pen resulted in an attractive blue line on the ink. You need to experiment here.


Enjoy.


©Jackie Bowcutt January 2011
Related Posts Plugin for WordPress, Blogger...